
To restore old thrifted furniture, start by evaluating its condition and cleaning thoroughly. Sand rough spots and consider priming if needed, then apply multiple thin coats of paint with your chosen color and finish. Upgrade hardware by replacing handles or knobs for a fresh look, and experiment with distressing or crackle techniques for character. Finish with a protective sealant and secure hardware firmly. Keep exploring these steps to bring out the best in your vintage find.
Key Takeaways
- Assess furniture condition and plan necessary repairs before starting the restoration process.
- Clean and sand surfaces, then apply primer and multiple thin coats of paint for a smooth, fresh finish.
- Upgrade hardware with new knobs or handles to enhance style and functionality.
- Use distressing or crackle techniques to achieve a vintage or shabby chic look.
- Seal the finished piece with wax or polyurethane to protect the restored surface and ensure longevity.
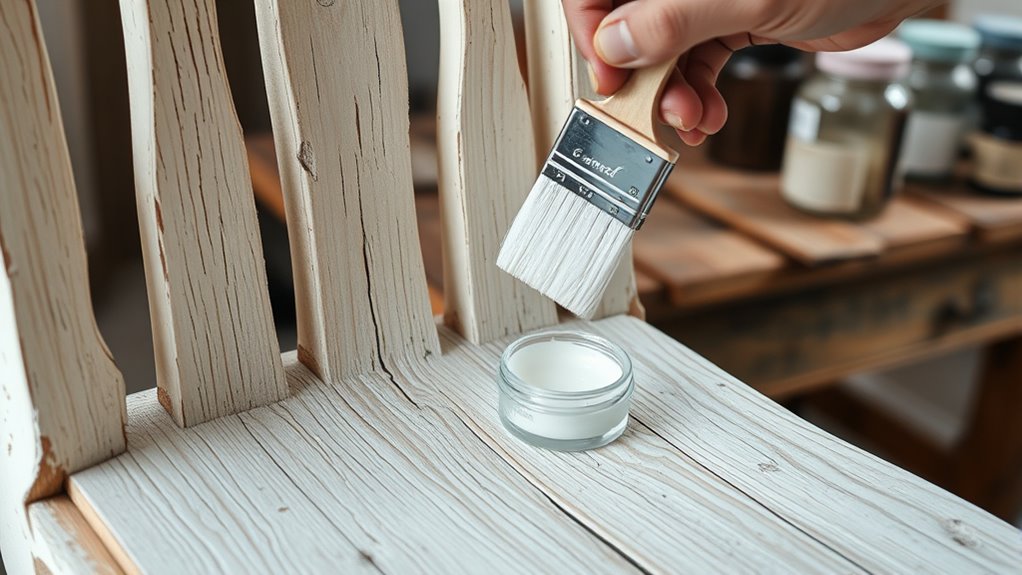
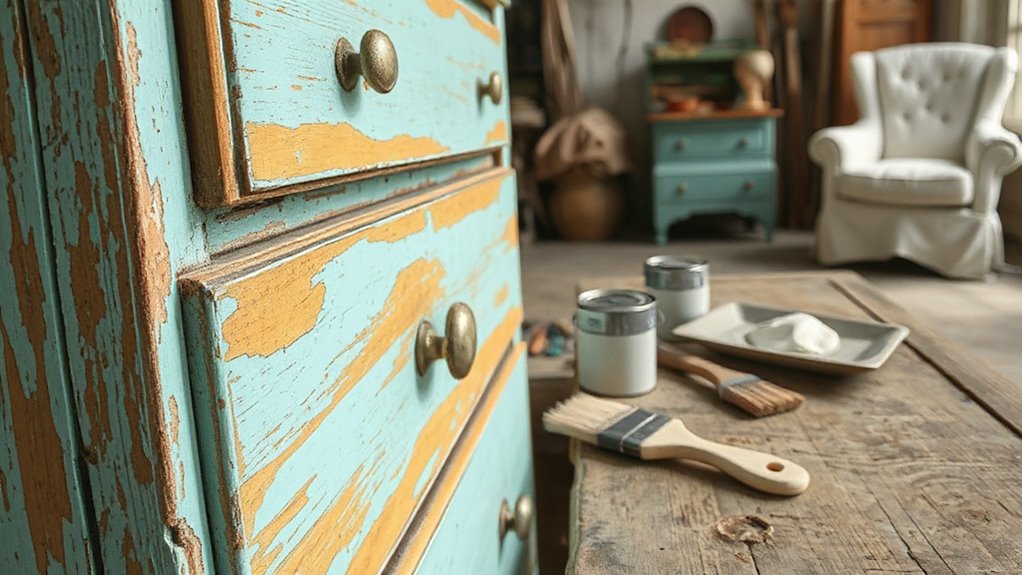
Restoring old furniture is a rewarding process that combines patience, skill, and a keen eye for detail. When you decide to breathe new life into a thrifted piece, the first step is evaluating its condition. Once you’ve determined what needs fixing, you can start planning your transformation. One of the most impactful ways to refresh furniture is through paint techniques. Whether you opt for a smooth, solid color or a more textured finish, your choice of paint and application method will set the tone for the piece. For a vintage look, consider a chalk paint that adheres well to distressed surfaces, or use a brush and roller for a more uniform appearance. If you want a shabby chic or rustic vibe, experimenting with distressing techniques—like sanding edges or adding a crackle finish—can add character and charm. These paint techniques allow you to customize your furniture to match your style and give it a unique personality. Additionally, understanding color accuracy and how it influences the final appearance can help you select the right colors and finishes for your project.
Hardware upgrades are equally essential in elevating the piece’s overall look. Old, tarnished knobs or handles can drag down even the most beautifully painted furniture. Replacing these with modern or vintage-inspired hardware can instantly modernize or vintage-ify your find. When selecting new hardware, consider the style and finish—brushed nickel, antique brass, or matte black—to complement the paint and overall aesthetic. Installing new hardware is usually straightforward, but make sure to measure the existing holes carefully or drill new ones if needed. This small change can dramatically improve the furniture’s appearance and functionality, making it feel fresh and purposeful.
As you work through these steps, remember that preparation is key. Sand any rough spots, clean thoroughly, and prime if necessary, especially if you’re working with darker or bold colors. Proper preparation ensures that your paint adheres well and lasts longer. When applying paint, use even strokes and multiple thin coats rather than one thick layer to achieve a smooth finish. Allow each coat to dry fully before adding the next. After the paint has set, sealing with a clear wax or polyurethane can protect your work and give it a polished look. When it comes to hardware, take your time to ensure each piece is securely attached, and step back periodically to evaluate how the new elements blend with the painted surface.

HITHOS King Upholstered LED Bed Frame with 2 Storage Drawers, Velvet Platform Bed with Wingback Headboard, Solid Wooden Slats Support, No Box Spring Needed, Headboard Splicing Design, Beige
Lavish and Modern Style: This upholstered platform bed frame is perfect for any modern bedroom, stylish and functional....
As an affiliate, we earn on qualifying purchases.
Frequently Asked Questions
How Do I Choose the Right Paint for My Furniture?
You should choose a paint that matches your desired paint finish and color selection. Opt for a durable finish like semi-gloss or satin for furniture, which are easy to clean and resist wear. Consider the existing decor and your style when selecting the color, ensuring it complements your space. Test small samples first, so you can see how different paint finishes and colors look before committing fully.
What Tools Are Essential for Furniture Restoration?
Think of restoring furniture as wielding your toolkit like a skilled artist’s palette. You’ll need essential tools like brushes and sandpaper, plus a wood stain to enhance the grain and furniture polish for a final shine. A putty knife helps fix imperfections, while a tack cloth cleans dust. With these tools, you craft a masterpiece, transforming your thrifted find into a stunning, revitalized piece that’s full of character and charm.
How Do I Repair Broken or Missing Parts?
When repairing broken or missing parts, you should start by applying wood glue to the broken edges or loose joints. Clamp the pieces together securely with furniture clamps and let the glue dry thoroughly, usually for a few hours or overnight. If a part is missing, consider replacing it or fabricating a new piece. Once everything’s set, sand any rough spots for a smooth finish, and your furniture will look great again.
Can I Restore Furniture Without Sanding?
Restoring furniture without sanding is like painting a canvas directly—sometimes, it’s possible with the right approach. You can use upholstery tips to clean and reupholster fabric without stripping the wood, and apply a conditioning or refinishing product to refresh the surface. For antique preservation, focus on gentle cleaning and spot treatments instead of sanding, which helps maintain the piece’s character and value while giving it a fresh look.
How Do I Prevent Future Damage to Restored Furniture?
To prevent future damage, apply a protective finish like polyurethane or wax, which guards against scratches and moisture. Consider climate factors—if you live in a humid area, choose finishes that resist moisture, and keep furniture away from direct sunlight or heat sources. Regularly clean and reapply protective coatings as needed, and use coasters or pads to minimize scratches and water rings, ensuring your restored piece stays beautiful for years.

Aitjunz Farmhouse Queen Size Bed Frame with 51" Tall Headboard, Wood Platform Bed Frame with 20" Tall Roman Column Decoration Footboard & 2 Large Storage Drawers, No Box Spring Needed (Light Grey)
FARMHOUSE QUEEN SIZE BED FRAME: 79.9" L x 64" W x 51.2" H, Elevate your bedroom with exquisite...
As an affiliate, we earn on qualifying purchases.
Conclusion
Restoring old furniture is a rewarding way to breathe new life into thrifted finds. Sure, it takes time and effort, but the results are worth it—your piece becomes uniquely yours. Don’t worry if you’re a beginner; start small and learn as you go. With patience and passion, you’ll transform tired furniture into beautiful, functional pieces that tell a story. Plus, you’ll save money and reduce waste, making your home more eco-friendly and charming.

AMERLIFE 5 Piece Bedroom Set, Including Farmhouse Queen Size Bed Frame with 4 Drawers, 7 Drawer Dresser & 6 Chest of Drawers, 2 Nightstands with Charging Station for Bedroom, White
[Farmhouse Bedroom Set] 5-piece farmhouse furniture set includes a wooden bed frame, rustic 7-drawer dresser, 6-drawer tall dresser...
As an affiliate, we earn on qualifying purchases.

Itaar Queen Bed Frame with 53" Tall Headboard and 4 Storage Drawers, PU Leather Upholstered Platform Bed Frame, Built in Charging Station & Led, 2 Nightstands with Mirror, White
【Tall Headboard and Footboard】The 53" high headboard and 23" high footboard gives this queen bed frame a grand...
As an affiliate, we earn on qualifying purchases.