TL;DR
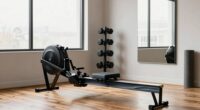
Acoustic treatment isn’t about blocking sound; it’s about controlling reflections and isolating noise. Moving your rig to a closet with proper ventilation can vastly reduce noise, making it a practical budget solution. Proper placement of panels and sealing gaps are key for a clean, dead sound.
Ever wonder why some tiny rooms sound like caves, while others become perfect little vocal booths? The secret isn’t just in buying foam or sealing gaps—it’s about where you put your gear and how you treat the space around it. A closet, surprisingly, can become a star player in your sound setup. But only if you understand the real tricks: damping, placement, and ventilation.
This guide cuts through the noise—literally—to show you how to turn a closet into a quiet, effective studio corner. Whether you want to record vocals, voice-overs, or just cut down on machine noise, you’ll learn how to do it smart, cheap, and simple.
Acoustic dampening
& the rig in the closet.
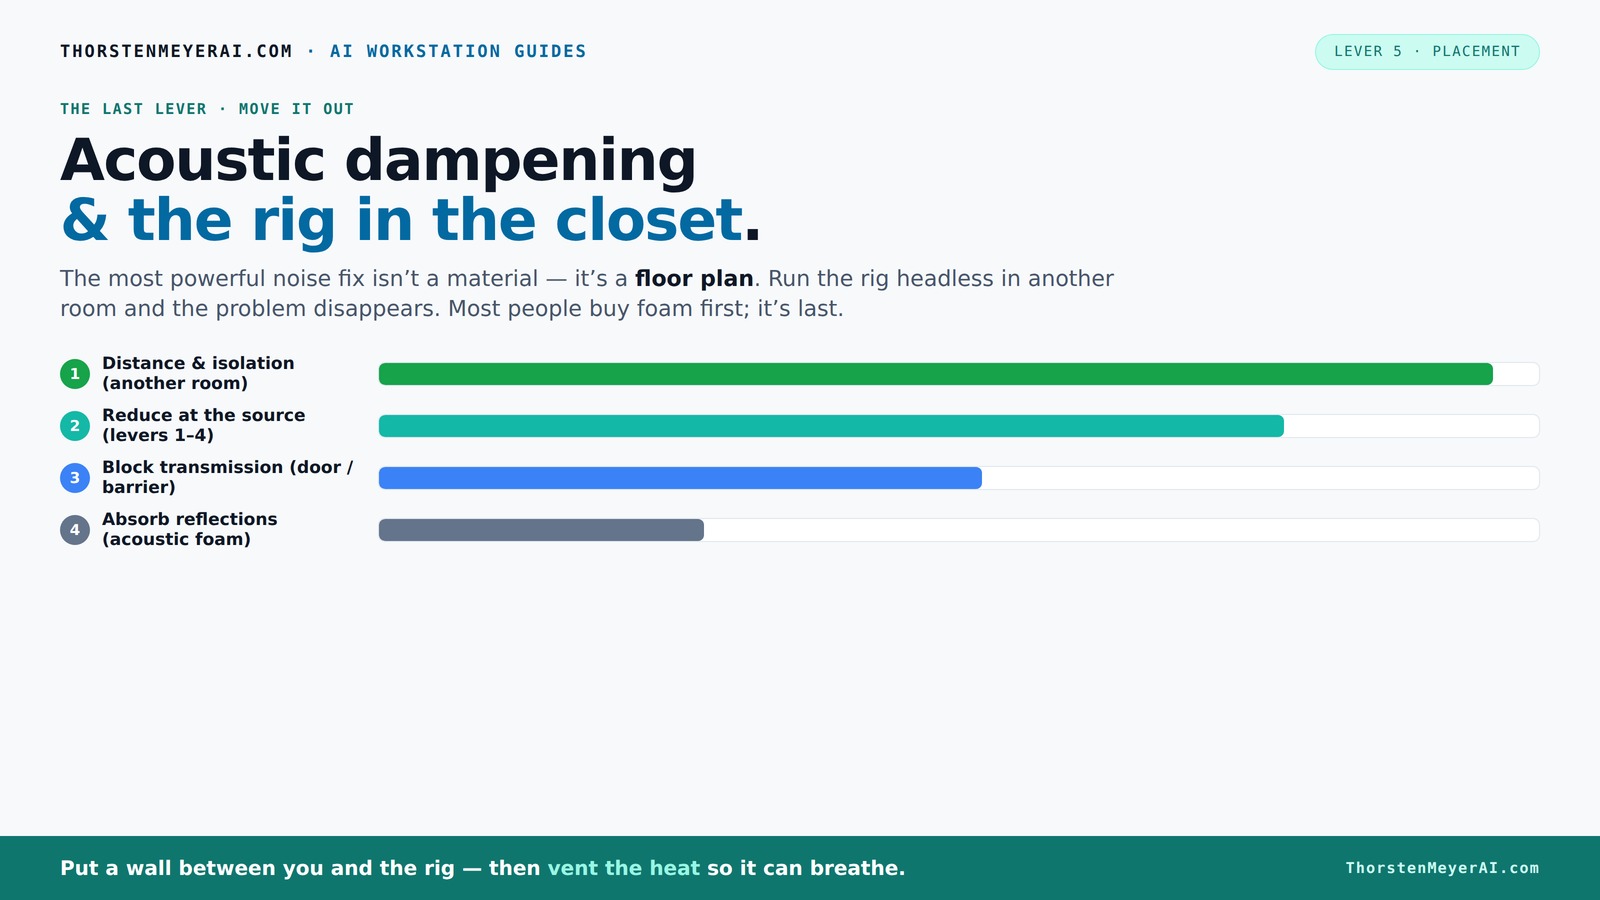
The most powerful noise fix isn’t a material — it’s a floor plan. A rig you can’t hear because it’s in another room beats any amount of foam. Tap the approaches in Part 1 to see what actually works.
(another room)
(levers 1–4)
(door / barrier)
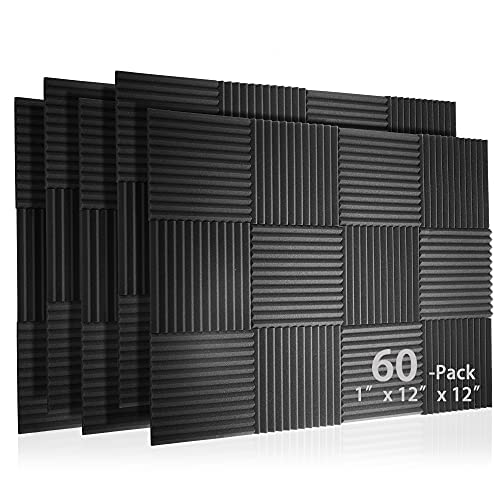
(acoustic foam)
Contain the noise, not the heat
Key Takeaways
- Moving your rig to a separate room or closet drastically cuts noise, often more than foam treatment.
- Placement of absorption panels and reflection filters around the mic reduces echo and improves clarity.
- Seal gaps and add door weatherstripping to prevent noise leaks effectively.
- Bass traps are essential if you notice low-frequency boominess in your recordings.
- Proper ventilation is a must — a sealed closet without airflow will turn into a heat trap.

Focusound 52 Pack Acoustic Foam Panels 1" x 12" x 12" Sound Proof Foam Panles Soundproofing Noise Cancelling Wedge Panels for Home Office Recoding Studio with 300PCS Double-Side Adhesive
Soundproofing - Acoustic foam panels triangular grooves structure for better noise absorption, helps to reduce and absorb unwanted...
As an affiliate, we earn on qualifying purchases.
As an affiliate, we earn on qualifying purchases.
What’s the real difference between acoustic dampening and soundproofing?
Acoustic dampening is about controlling how sound behaves inside a space—reducing echoes and reflections—while soundproofing stops sound from escaping or entering. Think of dampening as making the room sound better; soundproofing as blocking noise from outside.
For example, putting thick rugs and blankets in your closet dampens reflections, but sealing gaps around the door with weatherstripping prevents noise from leaking out. According to Soundproof Cow, most home setups focus on acoustic dampening because it's cheaper and easier than full soundproofing.
60 Pack Acoustic Panel Polyurethane Foam Sound Proof Acoustic Treatment Room Kit for Absorbing Sound on Walls, 1" X 12" X 12" Sound-Proof Material for Home Studio Ceiling (60 Pack) (60PCS)
Quality Material - We choose to handcraft with fine fabrics of polyurethane foam to finish our acoustic panels...
As an affiliate, we earn on qualifying purchases.
As an affiliate, we earn on qualifying purchases.
How to position your mic and panels for the best closet sound
Where you place your microphone and acoustic panels makes all the difference. Start by placing the mic away from reflective surfaces—about 6-12 inches from the wall behind it. Use a reflection filter or portable panel behind the mic to catch early reflections.
Next, treat the side walls at the points where sound bounces first—these are your reflection points. For a typical closet, focus on the wall behind the mic, the side walls near the microphone, and the ceiling overhead. A quick way: sit at your usual recording spot, have a friend hold a mirror at eye level, and mark where the light bounces back—those are your reflection points.
For example, a YouTuber found that placing a foam panel behind the mic and a few at reflection points cut echo by 50% in her closet booth.

Audimute Soundproofing Acoustic Door Seal Kit - Door Sweep and Seal - (Large Size)
Includes (2) Door Seals (3/16" x 1/2" x 50') and (1) Door Sweep (1/2" x 1.5" x 25').
As an affiliate, we earn on qualifying purchases.
As an affiliate, we earn on qualifying purchases.
How many panels do you actually need? The quick rule of thumb
Most small rooms or closets need only about 20-40% coverage to significantly improve sound quality. Covering every inch isn’t necessary. A simple setup might include a few panels on the side walls at reflection points, one behind the mic, and a bass trap in the corner if low-end muddiness occurs.
For instance, if your closet’s walls are 8 x 4 feet, placing 4-6 panels strategically can make a big difference. A comparison table below shows common coverage scenarios:

Sound Addicted - Studio Monitor Isolation Pads for 5 Inch Monitors, Pair of Two High Density Acoustic Foam which Fits Most Speaker Stands | SMPad 5
SMPad 5 is made out of the highest quality acoustical foam (50kg/m^3 density).
As an affiliate, we earn on qualifying purchases.
As an affiliate, we earn on qualifying purchases.
Do you need bass traps in a closet? Yes, but don’t overthink it
Bass buildup is common in small, enclosed spaces. If your recordings have a boomy or muddy low end, adding bass traps in the corners helps control standing waves. You don’t need expensive traps—rugged, dense foam or DIY rockwool panels work well.
For example, a musician added a simple DIY bass trap in the closet corner, and her low-end clarity improved dramatically. You usually only need bass traps if you notice frequencies below 100Hz lingering or booming.
Seal the closet door and gaps like a pro
Sound leaks through cracks, gaps, and under doors. Sealing these improves isolation. Use weatherstripping around the door frame, acoustic sealant on gaps, and even draft stoppers at the bottom. These cheap fixes can cut noise transfer by up to 70%, according to acoustic dampening.
For example, sealing my closet door reduced ambient noise from the hallway by half, making recordings much clearer.
Are reflection filters worth it? Yes, if used correctly
Reflection filters are portable panels that sit behind your mic, trapping sound reflections. They’re a quick, affordable way to improve vocal recordings. Place the filter about 3-6 inches behind the mic, and angle it slightly to catch reflections from the walls.
A singer-songwriter reported that adding a reflection filter made her vocals sound fuller and less hollow, even in a small closet. You can learn more about microphone accessories and how they improve vocal recordings.
When is a closet better for vocals than for instruments?
A closet makes a great vocal booth because soft clothes absorb high frequencies, smoothing out harsh sibilance. However, for instruments with long sustain or lots of low-end, it can sound boxy or muddy. Consider adding bass traps and avoiding hard surfaces near the mic for best results.
For example, a YouTube creator found her closet was perfect for voiceover work but not ideal for recording drums due to the bass buildup. Check out tips on acoustic treatment for small spaces.
How to avoid a boxy, hollow sound in your closet
Too many soft materials can deaden your sound, making it sound like you're singing in a box. Balance is key. Use a combination of absorption and diffusion—like a few foam panels plus some diffusers or bookshelves—to keep the sound lively enough.
For example, a podcaster added a few diffusers and some rugs, and her recordings became clearer and more natural without echoing or hollow effects.
DIY vs. structural upgrades: what’s worth it?
DIY solutions like moving blankets, foam panels, and rugs are affordable and effective for small setups. Structural upgrades—adding drywall, Green Glue damping, or building a custom soundproof box—are costly, time-consuming, and often unnecessary unless you need total isolation.
For example, a hobbyist turned his closet into a makeshift studio with blankets and foam, saving hundreds compared to full renovation.
Keep your closet cool: ventilation must come first
Putting a hot, high-power rig in a sealed closet traps heat, risking damage and throttling. Always add ventilation — passive vents, exhaust fans, or ducted airflow. Without proper cooling, your noise solution might turn into a hotbox.
For example, an AI researcher installed a quiet exhaust fan and ducted air from his closet, keeping temps below 80°F even during prolonged workloads.
Learn more about cooling your rig in [this guide](https://thorstenmeyerai.com/reduce-heat-noise-ai-workstation/).
Frequently Asked Questions
How do I know if my closet is too echoey?
Record a simple vocal or instrument and listen for flutter echo or harsh reflections. If your sound is hollow or boomy, it’s time to add some treatment, especially at reflection points.Can I just use blankets instead of panels?
Yes, moving blankets and rugs work well for quick, budget-friendly treatment. They absorb high frequencies and reduce echo, but won’t control low-end or leaks as well as dedicated panels.How do I prevent my rig from overheating in a closet?
Add ventilation—passive vents, exhaust fans, or ducted airflow. Keep an eye on ambient temperature and consider liquid cooling if necessary. Proper airflow keeps your hardware safe and quiet.How many panels do I need for a small closet?
Typically, 4-6 well-placed panels at reflection points, plus a bass trap if needed, will do the trick. Don’t overthink it—less is often more if positioned correctly.Is it better to treat walls or the door first?
Start with sealing gaps around the door, then treat the wall behind the mic and reflection points. Prioritize gaps and reflection zones for maximum impact.Conclusion
The smart move? Treat your closet as a flexible, low-cost studio. Prioritize placement, sealing, and ventilation over endless foam. With the right approach, you get a quieter, clearer space—without tearing down walls.
Imagine your workspace—silent, cool, and perfect for voice or music. That’s the power of a well-planned closet setup. Are you ready to turn your cluttered closet into a secret recording weapon?